Hey everyone,
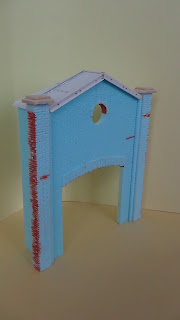
From time to time a modeler has to take on new challenges and in each of my vignettes I test new (at least to me) techniques that can improve my modelling skills. This time I decided to build my own garage from scratch with blue styrodur, plastic card, a bit of balsa wood and a bit of aluminium sheet (that was wrapped around the cork of a wine). I started with drawing the general shape of the facade of the garage on a sheet of paper. As you will see I got inspired by Miniart's garage to create mine but I made it smaller to fit the scene with the Renault FT in progress which is quite small. Watch out, you may think this is a unnecessary step but I really advise you not to skip this step because it will give you an idea of the size of the building, it will help you to make sure all dimensions fit well and it will also make you think about the way you are going to build the next features of the building (for example: the roof, the ornaments, the windows, the door, the gutter...). Inspiration will come while building it but the general lines should be already in mind and the different steps planned. I built the facade on the basis of the next dimensions for one brick in 1/35th scale: length 7 mm, width 3 mm, height 2 mm. These are not the official measurements for a brick in 1/35 because there are several different measures for bricks but I think these look good in that scale and aren't too complex to work with. With these in mind I then drew the facade of my garage on a sheet of paper and once I was pleased with the general result I reproduced it on a sheet of blue styrodur of 6 mm. As you will see on the pictures I also added two levels of bricks (blue styrodur of 3 mm) on the sides of the facade in order to give more relief to the building. I also added a little decorative design in the bricks above the round window and above the large front door by using blue styrodur of 1 mm and gluing brick by brick on the facade. The bricks were carved in the blue styrodur with a steel ruler and a modelling knife and sometimes a pointy tool helped too. Always start by making the horizontal lines first with a metal ruler and your hobby knife and then the vertical ones just using your hobby knife. Since I'm not used to blue styrodur yet and I don't have it in all thicknesses I used Das Pronto clay to fill in some unwanted joints and to correct some mistakes. It's the first time I use this material for filling in holes and joints and I'm quite happy with the way it turned out because it was easily diluted with water in case the clay was too thick to fill in small gaps and it remained soft long enough to be able to model the bricks that needed to be repaired. I made stones from balsa wood that I sanded to put on both corners of the building because I thought it would add something to the building and it could also stand logically there against the rain. Since I wanted the garage to be made from different materials I opted for a metal roof that is made from plastic card and strips, from aluminium sheet and some home made rivets and bolts from Meng. The roof seems easy to make but finally appeared more difficult than I thought because of the angle it needed to make to fit the facade and because of the diagonal cut at the back of the scene.
I still have to make the large wooden front door, the round window, the gutter and details but I'm confident this will be done without too many problems.
Here are some pics. Enjoy and stay tuned!


HAPPY MODELLING!