mardi 13 novembre 2018

Belgian T13 type I (part 3): Interior of the hull and engine finished

Hey everyone,

Little update about the T13. The interior of the hull as well as the engine are finished and everything is dry-fitted. I had to make a new part that covers the engine withe the two beams that fit under the turret from plastic card because the kit's part was torn. I detailed the engine and made a new control panel on the dashboard. Everything seems to fit wel so far.


HAPPY MODELLING!

jeudi 25 octobre 2018

Belgian T13 type I (part 2): the bogies and the interior of the hull

Hey everyone,

I started working on Retrokit’s T13 that I have presented on this blog before (link to the intro). As I said, the kit is great and the different parts come together quite well BUT there is a lot of cleaning up to do and in my opinion, it’s better to remake the rivets. I started by building the bogies. These are very fragile and must be assembled carefully. I will glue them to the hull at the end of the building to avoid breaking them during the rest of the building process.

I also worked on the interior of the tank and glued the big part at the rear that represents the gas tank and the ammo boxes!!!! 😲 That part is extended to the front of the tank by a separation  between the engine and the fighting compartment. The wooden floor under the turret is made with plastic card as well a second foldable seat in the turret itself. One foldable seat is provided in the kit for one of the crew members next to the driver but Domi from Retrokit informed me that he found out that a second foldable seat was probably located in the turret. Thanks to his documentation we could conclude that this was indeed the case so I scratched one in the turret. As you can see on the pics, I also started to work on the rivets of the interior. Next step: the engine.

Stay tuned, an update will follow this weekend!


HAPPY MODELLING!


jeudi 4 octobre 2018

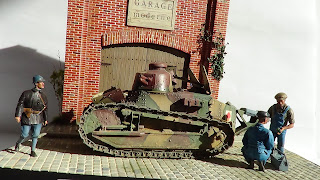
Dio "La France avance, Renault accélère." FINISHED

Hello dear readers,

The Renault FT dio is finally finished. The MK35 and Steelmasters figures were glued on the the base alongside the FT tank. This project was the opportunity for me to build my first scratchbuilt building and also to use a new (to me) weathering technique with the crackling medium.

Here are all the different steps of this project in the chronological order:

Building of the Renault FT part 1
Building of the Renault FT part 2
Building of the Renault FT part 3
Tank officer figure
Renault FT base painting
Renault FT black disruptive lines and postshadowing
Scratchbuilding the garage part 1
Scratchbuilding the garage part 2
Renault FT finished: the weathering
Painting of the garage

I hope you like it. Enjoy the pics and don't forget: you can enlarge the pics just by clicking on them!


HAPPY MODELLING!